Sunday, March 31, 2013

Happy Eggs to Celebrate New life and Fresh Starts


Glad Påsk!!! Or, just Happy Easter in English. Here in Sweden, as I’ve mentioned before, baskets are not filled with eggs and goodies on Easter morning. Instead, paper eggs are stuffed to the rims, and then some, with treats and candy and are passed out on Easter’s eve, or Påskafton in Swedish. The symbolism of opening an egg to signify new life and fresh starts is a wonderful tradition, and while I love the American tradition of Easter baskets and hunting for eggs, embracing a new tradition can be great fun too.


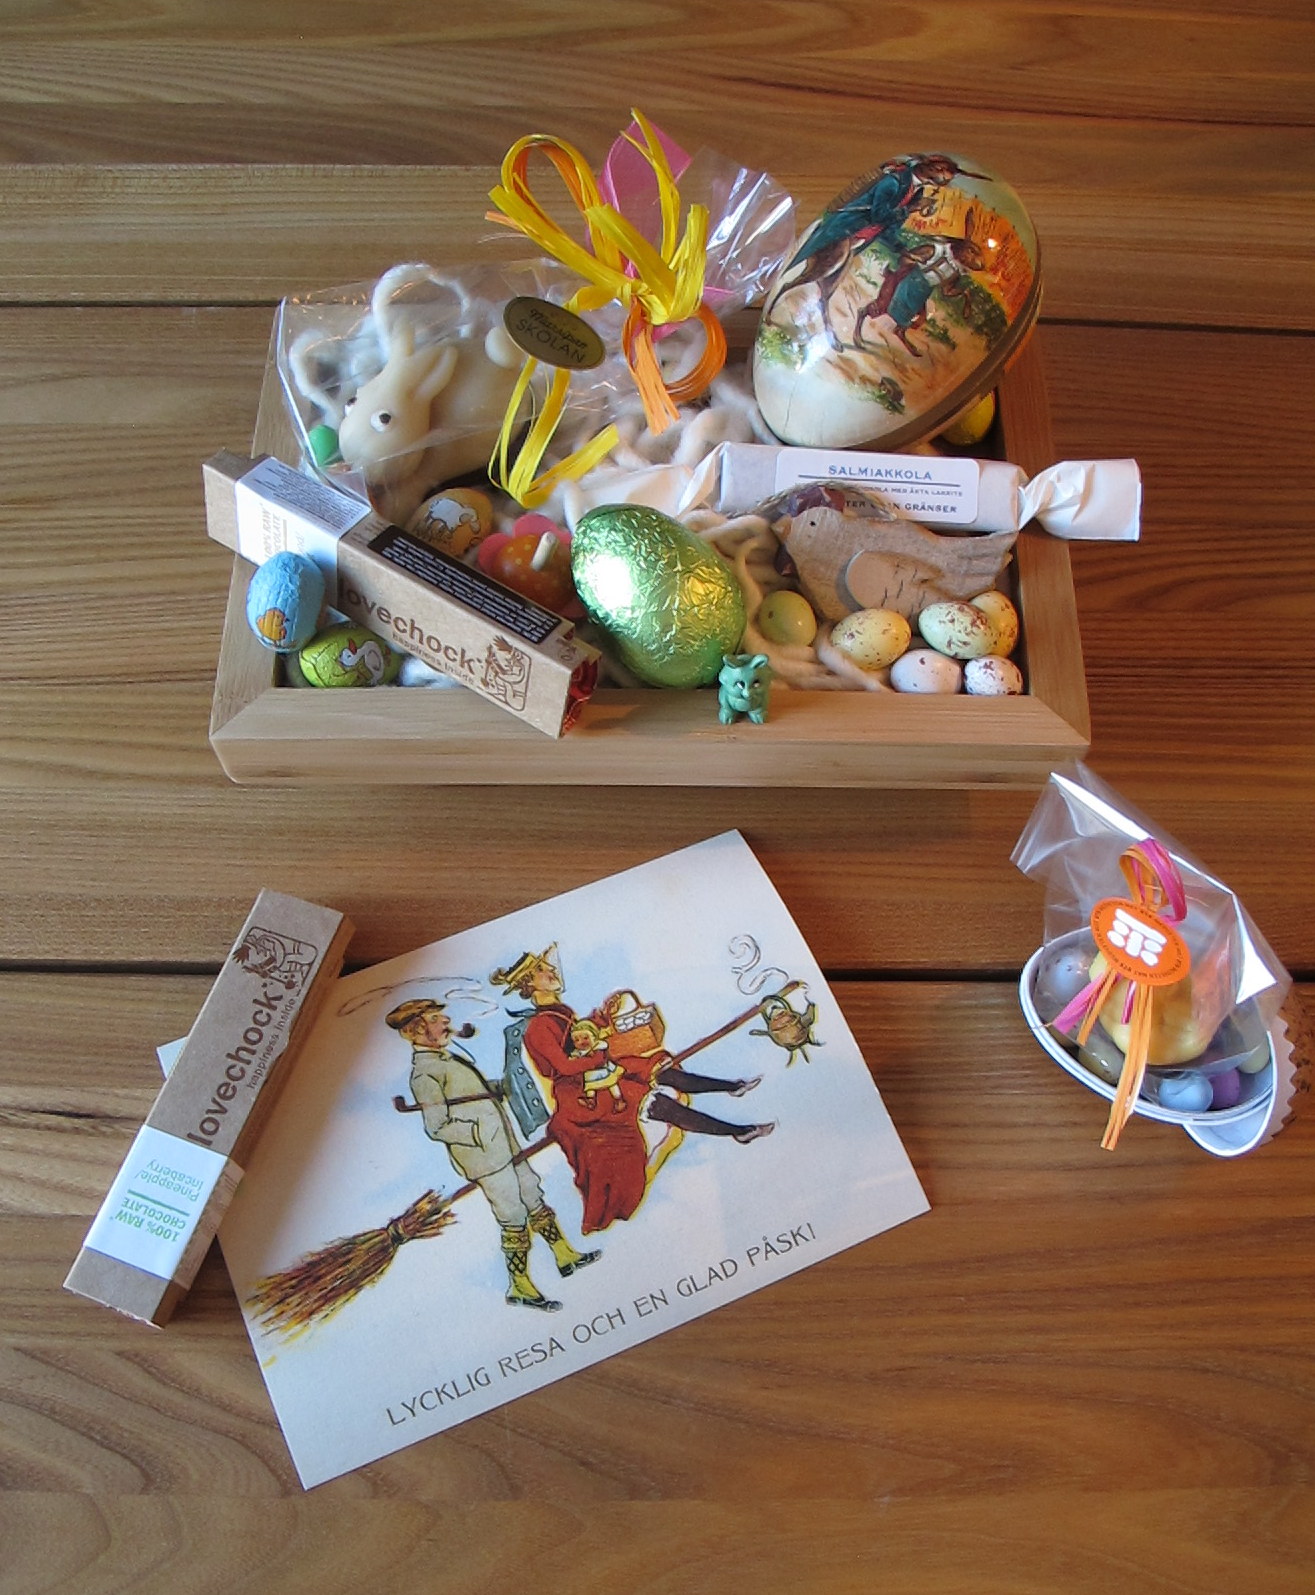
And embrace this tradition I have! I'll be honest. I did not buy the biggest egg that I could find to fill with goodies and treats but I did buy one that was large enough to mostly satisfy my craving, and hold everything I bought to fill it with. This large-ish egg is probably a foot long and about six inches in diameter. That holds a LOT of candy and if folded just right, it even holds a large linen robe, which was part of my husband’s Easter egg treat this year. My egg was the same size but unfortunately, or fortunately, it was not able to accommodate all of my goodies. Therefore my egg, filled with every wonderful treat you can imagine, was placed in the lovely wooden basket that was to be part of my goodies and was wrapped and tied with a lovely green ribbon. 


Maybe we are too old to be so excited about filling, giving, and receiving Easter eggs but I just feel like we will always be kids at heart. And if we are lucky enough to make it to eighty or ninety I’m sure we will still decorate and fill Easter eggs (or baskets) for one another, regardless of whether or not we have kids of our own. It is just something that makes us happy. 


What are the traditions you keep going? Perhaps you have a nice quiet picnic outdoors by yourself with a good book, or a formal family dinner at a relatives home... Whatever you do, or don't do, consider starting a new tradition that can be special to you and those you love. Picking up a new, pretty journal to write in, dropping by to visit a friend for a cup of coffee or tea, or even sending a secret care package to someone in your life are all things that celebrate new life and fresh starts.

I hope you all have a Happy Easter... and a fresh new start as we enter spring...

Friday, March 29, 2013

Ceramic Love


(Overview)

I don’t know if I mentioned this before but I‘ve been taking ceramics classes for the past five or six months. I took my first ceramics class way back in my LA days. Back when the weather was warm enough and dry enough that I could throw a bowl, plate, or mug at the beginning of class, set it outside to start drying, and by the later part of class it had reached what is called the “leather hard” stage and I could trim the bases, or attach handles etc. This also meant that we had ceramic pieces at various stages of completion, as our teacher was constantly bisque firing* and glaze firing** through out the class. 

(Kitty curiosity)

For me this was a wonderful thing. I love surprises and every time I arrived for class there was always the excitement of not knowing if I would have a completed piece ready to make its journey home with me. The excitement and anticipation was half of the fun. My class here in Stockholm is operated somewhat differently but no less exciting. Due to the small space of the studio however, we make all of our ceramic pieces during the first seven sessions and glaze everything on the eight and final class day, when the studio is transformed from a ceramic “verkstad” into a “glaze studio.”  

("Fågelbo" - birdhouse)

Buckets of glaze are placed in nearly every nook and cranny and my classmates and I carefully “ursäkta,” or excuse ourselves, as we tiptoe around the studio, gently holding our pots and bowls with metal tongs, dipping our pieces in what hopefully will turn out to be a beautifully, glazed finish. On “glaze day” of my most recent ceramics class, which was just a couple of weeks ago, our teacher mentioned that we could expect to get our finished, glazed pieces back in a month’s time. She would be taking a lovely vacation to Italy and, well, it just takes that long to fire up the kiln*** repeatedly to accommodate the literally hundreds of pieces that are made during eight weeks of day, evening and weekend classes. 


(A kanelbulle plate??!)

So imagine the surprise and delight when I arrived for the first day of my third class term (last night) to discover my cupboard filled with all of my completed glazed pieces. It is like Christmas day. One never know how a piece will turn out in the end and it is always exciting to see if the glaze took well and/or if the piece managed to keep from exploding. There could also be cracks, which there were a couple, and there could be areas where the glaze for some reason didn’t reduce well, which, though not completely obvious, there were a few also. Or there could even be unexplained defects, such as a small, hard, sharp brown bump on the inside of one of my biggest pieces to date (sad face). 

(Tea for two... or two for tea)

But not to worry, one comes to love and expect such defects and imperfections with this wonderful and extraordinary, organic craft. All in all I was very happy with the outcome and I happily packed up as much as I could carry, and still run to catch the bus, and made my way home to let my husband open them up and revel in the surprise and excitement all over again.

(Fika ready tray)


*The first firing that removes all traces of dampness from the piece.

** The final firing after the piece has been dipped in a glaze that hardens into a glass outer-shell and becomes a beautiful shiny or matt finish, depending on the type of glaze selected.

***The oven where ceramics are baked on their final journey to completion.

Tuesday, March 26, 2013

Coconut Sugar

It seems that coconut sugar is all the rage these days. Along with coconut water, juicing green things, healthy smoothies, and, of course, homemade sweet potato fries. Sweet potato fries? Yes, sweet potato fries, but those are for another discussion on another day. Right now I want to talk about coconut sugar. I tried to find some reliable information on the benefits of coconut sugar versus regular sugar but mostly what I found was that coconut sugar is lower on the glycemic index, it is considered to be a better alternative to refined sugar and brown sugar, especially for diabetics, and it is on the up trend. While I normally buy organic sugar and try to avoid all refined products, I was pleased to learn that coconut sugar is high in minerals and B vitamins, in addition its other positive benefits. And apparently, it tastes delicious in banana muffins. Take a look below...

A sprinkling of pecans on top is the perfect finishing touch.

Can't you just taste them? At our house we love banana bread and banana muffins. We sometimes buy bananas and wait for them to over ripen just so we can make bread or muffins with them. The other day we had three perfectly ripe bananas. There was not a speck of green left on them and they hadn't started to develop "freckles" yet. I told my husband that if he refrained from eating them, I would make banana bread in the next day or so. This announcement is always met with glee. He unhesitatingly replied, "Ok!" 

Combining the wet and dry ingredients.

Little did he know however that his beloved banana muffins would be getting a make-over. I used whole spelt flour instead of regular wheat flour and I used coconut sugar in place of white or brown sugar. I've sometimes substituted brown sugar because it provides a richer and rounder flavor. That is, until I tried using coconut sugar. Like brown sugar, it too has a carmel-like flavor and adds a deeper flavor dimension to the bananas, while maintaining a lower glycemic index level. The coconut sugar also provided just the right amount sweetness to the muffins to keep them from bordering on being cupcakes.

... and a glass of oat milk... mmmm.....

Will I continue to use coconut sugar when this small, slightly costly bag runs out? I haven't yet decided for sure but I can say that I love the adventure of baking with coconut sugar. And a good sprinkle on my oatmeal isn't a bad way to start the day. The question is, will you try it? Will you pick up a package of coconut sugar to substitute in your favorite baking recipes? If you do, please let me know how it turns out. And if you've already tried coconut sugar, I'd love to hear what you think of it...

Friday, March 22, 2013

A Modern Easter Tray


It is fairly common to use an alternative container in lieu of an actual basket to fill with goodies and treats for Easter. I myself have used mint-green, metal pails filled with shredded brown paper instead of Easter grass as the base for Easter eggs and personalized small gifts, such as a bright, new kitchen towel for mom or a squeegee for cleaning the car windows for dad. And when I think about it, a colander filled with various kitchen goodies would be a fun idea for mom, or a friend who loves to cook. 


There are so many possibilities for using something different or unique instead of a traditional Easter basket. If you are environmentally conscious, re-using those cute little plastic or paper, berry baskets from the grocery store, accented with ribbons or colored jute would be cute, as would crafting your own “baskets” out of recycled cardboard boxes or paper bags. Here in Sweden baskets are not used at all. Instead they fill these adorable, oversized, paper eggs with candy or treats. There are several different styles ranging from colorful, foil-wrapped eggs to eggs with lovely, old-fashioned Easter scenes on them to do-it-yourself plain eggs that you can paint, decoupage or otherwise decorate how you’d like.


I absolutely love these eggs, and the bigger they are the better. Our first year here I told my husband that I wanted the biggest egg he could find, though I told him not to fill it up with candy. He ended up getting a bigger egg than me but that’s okay. Most of the fun is in giving them away. They are a fun, even whimsical, way to celebrate the coming of spring and renewed life, as one literally gets to crack open the egg to obtain the surprises inside. And while I still plan to stuff a few lovely paper eggs full of goodies for those near and dear, this year I wanted to also do something "annorlunda" (the Swedish word for different). I wanted to take an everyday object, a simple unsuspecting item, and use it in a new way. 


When I came across this cute, wooden tray I knew it was the perfect vehicle. I love the earthy element that natural wood lends and the soft, bulky yarn creates the perfect nest in which to nestle goodies. It is simple and elegant and yet not overdone. 


Tray by Design House of Stockholm

... and wouldn't this container be cute? 

What do you think? What type of alternative container would you use instead of a basket to fill with Easter goodies?

Sunday, March 17, 2013

Hearty Homemade Bread


How do you spend your "lazy" weekend mornings? I began mine yesterday with my favorite coffee mug full of strong coffee with a “touch” of real coffee cream. It is a weekend morning ritual I look forward to all week. I like to sit and drink it while I catch up on my girl nerd blogs and other social media sites. Then after I was sufficiently awake and ready to face the day, the real work started. I baked two loaves of bread, washed three loads of laundry, painted the two already prepped walls in our guest bedroom, one coat on each wall, went out to shop for Easter björkris (birch twigs with feathers attached to the tops to celebrate Easter and the coming of spring), as well as a couple of bunches of ranunculus, a small pot of tulip bulbs, a bunch of pussy willow branches, and a few flowering cherry blossom branches. Needless-to-say, it is looking quite Easterly around here now. I also bought a few other Easter-related items but those will be revealed later this week. So stay tuned...


But what I really want to tell you about however is the bread that I baked. It is quite possibly the best bread I have ever eaten, not to mention the best bread that I myself have ever baked. I am not exaggerating when I say that I ate three slices, two of them as soon as it had cooled down enough to slice without it crumbling to pieces. The original recipe was given to me by one of my work colleagues and I am so glad that she did. If I remember correctly, the recipe comes from a local restaurant called Magasinet, which is just north of Stockholm. If you like a hearty bread full of earthy textures and a slight hint of sweetness, this bread is for you. It is deliciously moist and tastes wonderful slathered with butter, but it is also fantastic with a thin layer of almond butter drizzled with honey and a light dusting of cinnamon. Did I mention that it “helps” with your “digestion” as well? One more reason to get out those baking pans and head to the grocery store right now! 


Adapted from Magasinet’s Recipe (Swedish ingredients in parenthesis)

Ingredients:
500 ml whole wheat flour (fulkorns vetemjöl)
200 ml graham flour (grahamsmjöl)
300 ml sifted rye flour (rågsikt)
200 ml cracked rye berries* (or cracked wheat berries, or steel cut oats) (rågkross)
100 ml wheat bran (vetekli)
150 ml wheat germ (vetegroddar)
1 Tsp. salt
4 Tsp. baking soda (bikarbonat)
1 liter light buttermilk, or light, plain yogurt (lättfil)
200 ml dark syrup (mörksirap)

Directions:

*Soak the cracked rye berries in water for 15 minutes, then drain and use in recipe.

Heat oven to 350 F (175 C). Mix all dry ingredients, including the presoaked cracked rye 
berries. Add wet ingredients and blend well. Pour evenly into two prepared loaf pans 
(buttered and coated with bread crumbs) and bake for 100 minutes. Cover pans with 
parchment paper or foil after 70 minutes and continue baking the remaining 30 minutes.

Helpful tips:

Freeze what you cannot eat within a couple of days. I slice both loaves in half and 
freeze two of the halves. They thaw beautifully when you are ready to eat them. Simply take 
the frozen bread out of the freeze and allow to thaw at room temperature.

Eat with lots of butter (or jam, or both, or with cheese and a handful of sunflower sprouts, or almond butter with honey and cinnamon... or your own favorite creations).

(Ps. Happy St. Patrick's Day by the way...)

Thursday, March 14, 2013

Open-Face Enchiladas

The other day I was walking home from work when a sudden craving for a good old plate of enchiladas with rice and beans from Matt's Rancho Martinez in Dallas hit me like a ton of bricks. The longing was so intense, it almost made me cry. Lucky for me, we’ve been able to find ingredients here in Stockholm to make our own homemade substitute: corn masa and a tortilla press for making homemade corn tortillas, canned tomatillos (even fresh ones in season), real Mexican salsa, refried black beans, as well as salsa verde, etc. This availability of ingredients reminds me of home and comforts me to no end. And while it isn't quite the same as sitting in the festive atmosphere of Matt's and sipping a frozen margarita while digging chip after chip into bowls of salsa and chili con queso, having a homemade Mexican meal usually abates the craving and makes me feel like I can go on living. Until the next unbearable craving hits, that is. If I'm being honest, and honesty is always the best policy in my book, the craving comes around fairly regularly. Like, every other day or so. I maybe slightly exaggerating but not by much.


So, you may be asking yourself, “What is in that amazing creation in the photo above?” And I would answer, “Oh, just some corn tortillas, with a little cheddar cheese, refried black beans, pickled jalapeños, salsa verde, diced tomatoes, and avocado, that’s all.” Cilantro, diced green chilies, and chopped onion would be delicious additions as well. You can always use your imagination and add to your heart’s desire. Add scrambled eggs and you have the perfect brunch. Heck, you can even add shredded chicken, grilled chicken, or steak if that's your calling. Spanish rice and beans on the side are nice but I have not managed to perfect Spanish rice yet. This time around we did not have sides but ones I've made in the past have included a simple green salad with chopped lettuce and tomatoes, homemade guacamole, or black beans that have been doctored up with a bit of chili powder, ground cumin, and garlic, and a tablespoon or two of salsa. Use your Mexican imagination and go wild. In the summer I like to make a roasted corn and jalapeño salad with black beans, fresh lime, diced tomatoes, and cilantro. So amazing. 

What would you pair these delicious open-faced enchiladas with?

Recipe for Quick Open-Faced Enchiladas

Ingredients for two people (double or triple recipe as needed):

8 Corn tortillas
1-1 1/2 c. Grated cheddar, Monterrey jack, or pepper jack cheese
1 c. Refried black beans
1 c. Salsa verde or tomatillo sauce
Pickled jalapeños to taste
1 Medium diced tomato
1 Avocado
Salsa to taste

Directions: 

Things to do ahead of time: 

Warm the salsa verde or tomatillo sauce and heat your oven to about 200 F (150 C). This will be for keeping the quesadillas warm while you are getting things ready to assemble.  

Begin making your cheese quesadillas. Place approximately 1/4 c. of cheese between 2 corn tortillas until you have 4 quesadillas total. In your cast iron skillet over medium high heat, grill your quesadillas on both sides just until the cheese has melted. Place on a foil covered baking sheet in your oven to keep warm as you continue making the quesadillas. 

Once all quesadillas are done you are ready to assemble. Place two quesadillas on each plate. Dollop 1/4 c. of beans on top of each quesadilla and spread to the edges. Place desired number of pickled jalapeños over the beans. Ladle 1/4 c. salsa verde or tomatillo sauce over the quesadillas, especially around the edges. Top with tomatoes and avocado cubes and add your favorite salsa to taste. 

Enjoy with your favorite person and be happy.

The end. 


One of these would go nicely with any homemade Mexican treat!

PS. I wrote a guest post at Katie's Delicious Ambiguity on a Mexican Skillet Scramble.

Wednesday, March 13, 2013

Sock Bunnies!


What do knee socks, thread, a couple of old buttons and some poly-fil stuffing all have in common? Just the cutest sock bunnies you've ever seen! Sometime last year when Pinterest became a viable force in my life, I came across a sock bunny tutorial that peeked my interest. It actually looked like something I could make within a short enough time frame, before my patience and interest ran out. Hence began my search for knee socks. Unfortunately knee sock season was over in Sweden and the only socks to be found were the short types. I turned to my own sock drawer where I happened to find a “gently used” pair in good enough condition so I grabbed my scissors and created Agnes. 

Agnes

I was pretty pleased with how she turned out, despite her wobbly nose and smile. And even though it took slightly longer than I would have hoped, sewing by hand, I was inspired to go on a sock bunny-making frenzy. That inspiration however dwindled over the remainder of spring... and summer... and fall... until one magical winter day when I had the idea for my crafting group, We Can Craft That, to make sock bunnies. After all, Easter would be here soon. So sock bunny making we did! It was great fun to watch the process and see how each bunny’s personality developed. Each one has its own special traits and some sock bunnies even looked like their mothers! 

From left to right, Cleo, Frank, Pat, Agnes, & Kanini

While sewing by hand takes a bit longer and requires a bit more patience and perseverance, it is the perfect [Easter] project to take up with a group of friends, your mother or daughter, or just on your own as a gift to yourself or a special someone. All you need is a pair of knee socks, scissors, a needle, thread, a couple of old buttons, some polyester fiber fill stuffing or even rice, which one of the girls used, (the insides of an old pillow work great as well) embroidery thread for the nose and mouth, and a little imagination. 

Working diligently... 

 Photo break!

Is this not the cutest bunny face ever?  

Stuffed with rice, Pat is looking nice! 

Cleo gets the final arm... 

Frank & Pat... best friends for life!

You can find the original tutorial here.